

In Lets Nurture
Before we start with app purchase, Let’s get a basic idea of what type of digital content we are selling to users. Google’s Billing system gives us mainly two types …


14
Dec. 202.4 K
VIEWSAugmented Reality (AR) is a technology that superimposes virtual objects on a user’s real-world view, creating an enhanced mixed reality experience. AR blends real and virtual objects into a single environment, allowing the user to interact with both real and virtual objects in a seamless manner.
AR technology uses a device’s camera to capture the user’s real-world view, and then processes this view using computer vision algorithms. This process involves identifying features in the real-world view, such as edges, textures, and patterns, and using these features to build a 3D model of the environment. The virtual objects are then rendered and overlaid onto the real-world view, creating an augmented experience.
AR experiences can be created using a variety of devices, including smartphones, tablets, and head-mounted displays. Some of the popular AR development platforms include Apple’s ARKit, Google’s ARCore, and Unity’s AR Foundation. These platforms provide developers with a set of tools and APIs to build AR applications, and they also handle many of the low-level tasks involved in AR development, such as camera tracking and feature detection.
AR Nodes, they are objects that represent virtual content in the AR environment. An AR Node can be thought of as a 3D object with a position and orientation in space, and can be used to represent anything from simple shapes to complex models. AR Nodes are typically used in AR development to build more complex AR scenes, and they allow for hierarchical relationships between objects. For example, an AR Node can be used to represent a car, and child AR Nodes can be used to represent the wheels, doors, and other parts of the car. This structure enables developers to manage complex AR scenes and control the behavior of individual objects within the scene.
For implementing AR into iOS. We need to import the ARKit package into the project.
Initialize pod for project using terminal to run below commands.
pod init
open Podfile
Add below 2 pods into the Podfile.
pod 'GoogleMaps'
pod 'GooglePlaces'
Save Podfile and run this command into terminal
pod install
Open your project .xcworkspace file.
Add below key into Info.Plist file
NSLocationWhenInUseUsageDescription
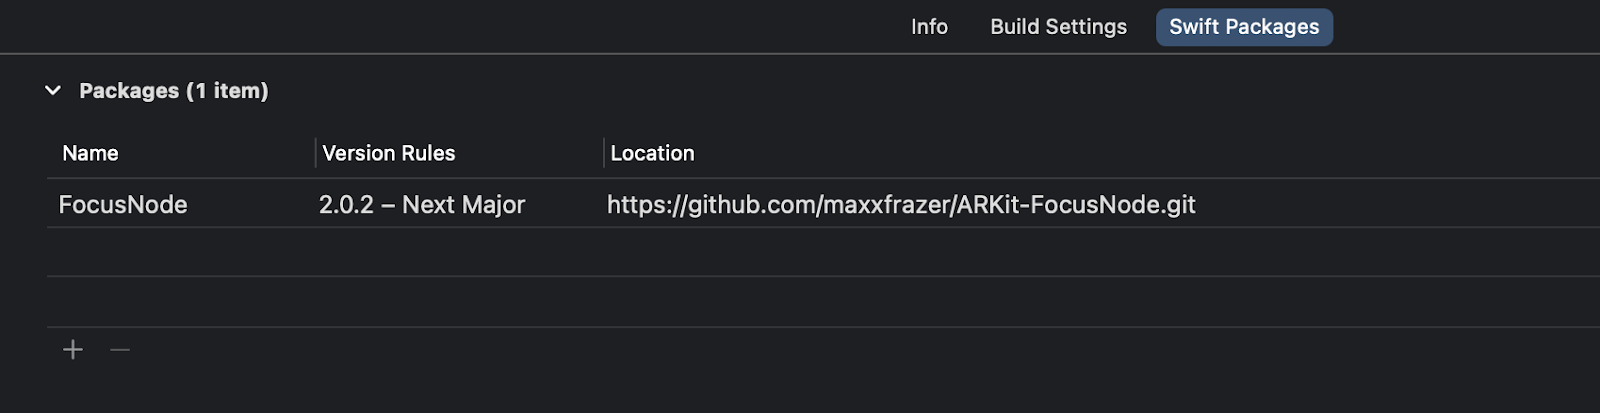
Add below swift package under Project target -> swift packages section
Create google api key and add it into the project globally.

Set Google api key when app launches. Add below code in appdelegate.swift file.
func application(
    _ application: UIApplication,
    didFinishLaunchingWithOptions launchOptions: [UIApplication.LaunchOptionsKey: Any]?
) -> Bool {
    GMSPlacesClient.provideAPIKey(GOOGLE_APIKEY)
    GMSServices.provideAPIKey(GOOGLE_APIKEY)
    return true
}
Add UIView and button to ViewController and assign GMSMapView class to UIView.
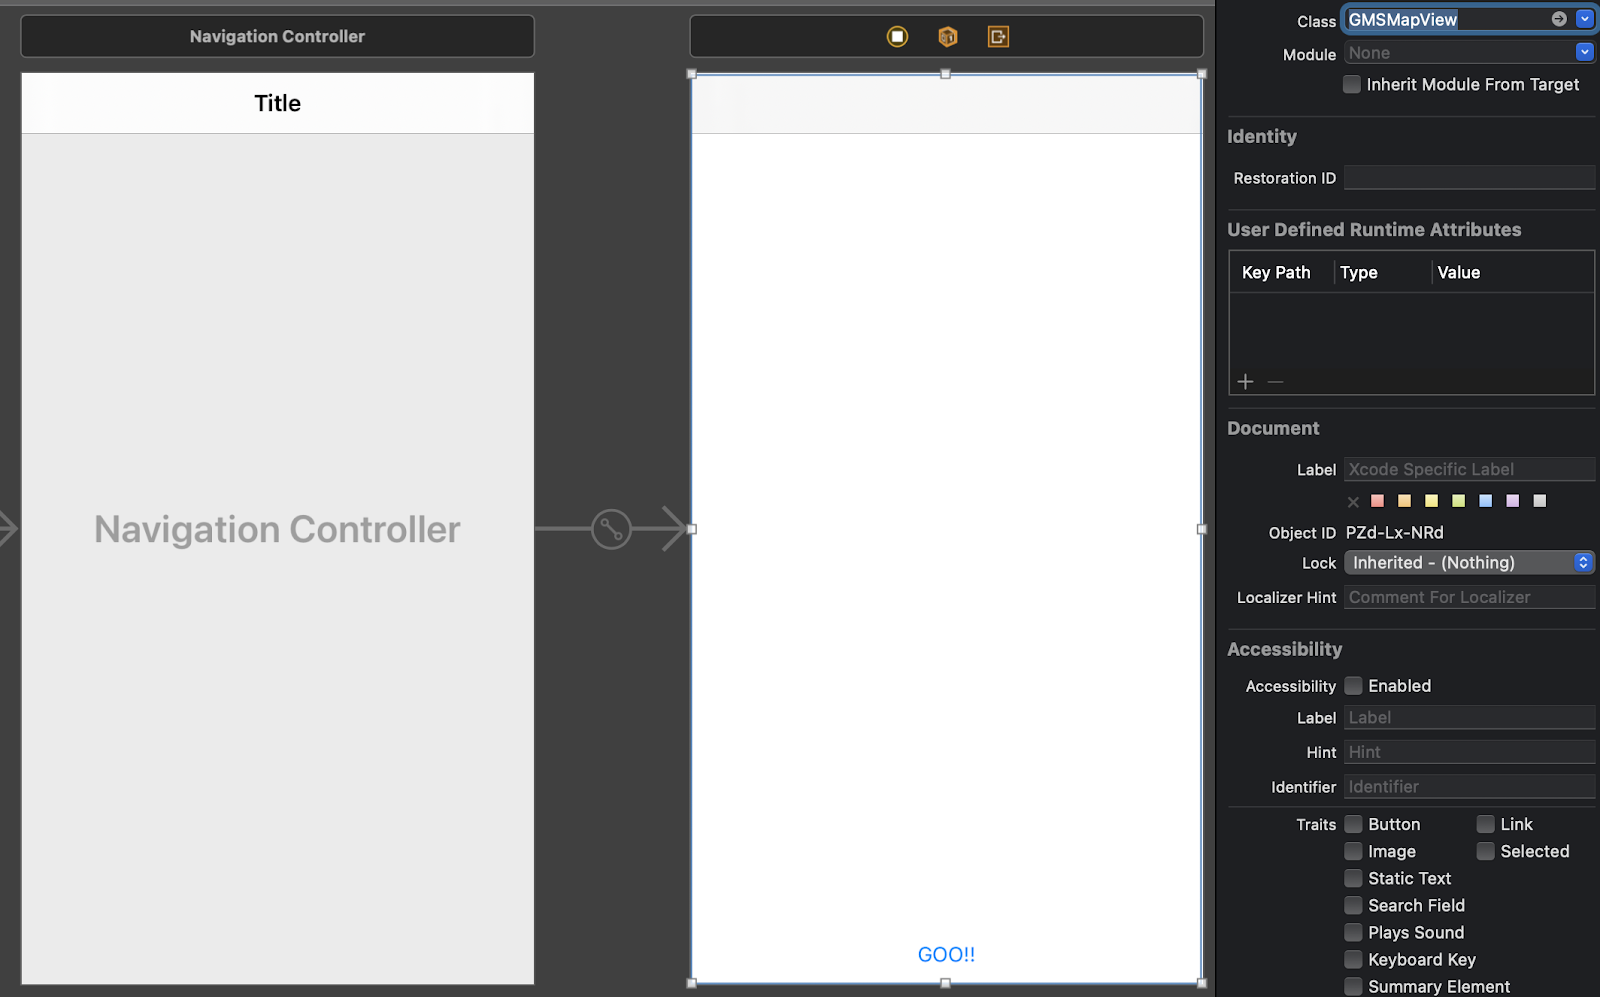
Create a MapViewController.swift file and assign it to the viewcontroller in the storyboard. We will setup google map related functionalities into this file.
import GoogleMaps
import GooglePlaces

class MapViewController: UIViewController {
    @IBOutlet weak var mapView: GMSMapView!

    //MARK: Go button action created
    @IBAction func navigateButton(_ sender: Any) {
        let vc = ViewController()
        self.navigationController?.pushViewController(vc, animated: true)
    }

    let locationManager = CLLocationManager()
    var currentLocation: CLLocation?
    var routeCoordinates = [CLLocationCoordinate2D]()

    var resultsViewController: GMSAutocompleteResultsViewController?
    var searchController: UISearchController?
    var resultView: UITextView?
    var selectedPin: GMSMarker?
}
Setup mapview functionalities when view controller loads.
override func viewDidLoad() {
    super.viewDidLoad()
    // Configuring location manager
    locationManager.delegate = self
    locationManager.desiredAccuracy = kCLLocationAccuracyBest
    locationManager.requestWhenInUseAuthorization()
    locationManager.requestLocation()

    // Configure mapView
    mapView.delegate = self
    mapView.isUserInteractionEnabled = true

    // Zoom to user location
    let camera = GMSCameraPosition.camera(withLatitude: 0.01, longitude: 0.01, zoom: 15)
    mapView.camera = camera

    // Hide back button
    self.navigationItem.setHidesBackButton(true, animated: false)

    resultsViewController = GMSAutocompleteResultsViewController()
    resultsViewController?.delegate = self

    searchController = UISearchController(searchResultsController: resultsViewController)
    searchController?.searchResultsUpdater = resultsViewController

    // Put the search bar in the navigation bar.
    searchController?.searchBar.sizeToFit()
    navigationItem.titleView = searchController?.searchBar

    // When UISearchController presents the results view, present it in
    // this view controller, not one further up the chain.
    definesPresentationContext = true

    // Prevent the navigation bar from being hidden when searching.
    searchController?.hidesNavigationBarDuringPresentation = false
}
We will get location coordinates for source and destination. From that value we will draw a path in below method.
//MARK: Draw polyline route from source to destination.
func getPolylineRoute(from source: CLLocationCoordinate2D, to destination: CLLocationCoordinate2D){

    let config = URLSessionConfiguration.default
    let session = URLSession(configuration: config)

    let url = URL(string: "https://maps.googleapis.com/maps/api/directions/json?origin=\(source.latitude),\(source.longitude)&destination=\(destination.latitude),\(destination.longitude)&sensor=true&mode=driving&key=\(GOOGLE_APIKEY)")!

    let task = session.dataTask(with: url, completionHandler: {
        (data, response, error) in
        if error != nil {
            print(error!.localizedDescription)
            //self.activityIndicator.stopAnimating()
        }
        else {
            do {
                if let json : [String:Any] = try JSONSerialization.jsonObject(with: data!, options: .allowFragments) as? [String: Any]{

                    guard let routes = json["routes"] as? NSArray else {
                        DispatchQueue.main.async {
                            // self.activityIndicator.stopAnimating()
                        }
                        return
                    }

                    if (routes.count > 0) {
                        let overview_polyline = routes[0] as? NSDictionary
                        let dictPolyline = overview_polyline?["overview_polyline"] as? NSDictionary

                        let points = dictPolyline?.object(forKey: "points") as? String
                        if let legs = overview_polyline!["legs"] as? NSArray {
                            let legsValue = legs[0] as? NSDictionary
                            if let steps = legsValue!["steps"] as? NSArray {
                                for i in 1 ..< steps.count {
                                    let dic = steps[i] as? NSDictionary
                                    if i == 0 {
                                        let startLocation = dic!["start_location"] as? NSDictionary
                                        let location = CLLocationCoordinate2D(latitude: Double((startLocation!["lat"] as? NSNumber)!), longitude: Double((startLocation!["lng"] as? NSNumber)!))
                                        self.routeCoordinates.append(location)
                                    } else if i == steps.count - 1 {
                                        let startLocation = dic!["start_location"] as? NSDictionary
                                        let location = CLLocationCoordinate2D(latitude: Double((startLocation!["lat"] as? NSNumber)!), longitude: Double((startLocation!["lng"] as? NSNumber)!))
                                        self.routeCoordinates.append(location)
                                        let endLocation = dic!["end_location"] as? NSDictionary
                                        let secondLocation = CLLocationCoordinate2D(latitude: Double((endLocation!["lat"] as? NSNumber)!), longitude: Double((endLocation!["lng"] as? NSNumber)!))
                                        self.routeCoordinates.append(secondLocation)

                                    } else {
                                        let endLocation = dic!["end_location"] as? NSDictionary
                                        let location = CLLocationCoordinate2D(latitude: Double((endLocation!["lat"] as? NSNumber)!), longitude: Double((endLocation!["lng"] as? NSNumber)!))
                                        self.routeCoordinates.append(location)
                                    }
                                }
                            }

                            //Path is available now, Let’s show path on map
                            self.showPath(polyStr: points!)

                            DispatchQueue.main.async {
                                // self.activityIndicator.stopAnimating()

                                let bounds = GMSCoordinateBounds(coordinate: source, coordinate: destination)
                                let update = GMSCameraUpdate.fit(bounds, with: UIEdgeInsets(top: 170, left: 30, bottom: 30, right: 30))
                                self.mapView!.moveCamera(update)
                            }
                        }
                        else {
                            DispatchQueue.main.async {
                                // self.activityIndicator.stopAnimating()
                            }
                        }
                    }
                }
            }
            catch {
                print("error in JSONSerialization")
                DispatchQueue.main.async {
                    // self.activityIndicator.stopAnimating()
                }
            }
        }
    })
    task.resume()
}
//MARK: Show path on map function
func showPath(polyStr :String){
    let path = GMSPath(fromEncodedPath: polyStr)
    let polyline = GMSPolyline(path: path)
    polyline.strokeWidth = 3.0
    polyline.strokeColor = UIColor.red
    polyline.map = mapView // Your map view
}
We will check if permission is granted or not. If permission is granted then we will request for location and update location.
//MARK: Configure CLLocationManagerDelegate method(s)
extension MapViewController: CLLocationManagerDelegate {
    func locationManager(_ manager: CLLocationManager, didChangeAuthorization status: CLAuthorizationStatus) {
        if status == .authorizedWhenInUse {
            locationManager.requestLocation()
        }
    }

    func locationManager(_ manager: CLLocationManager, didUpdateLocations locations: [CLLocation]) {
        currentLocation = locations[0]
        self.mapView.clear()
        let marker = GMSMarker()
        marker.position = (currentLocation?.coordinate)!
        marker.icon = UIImage(named: "current")
        marker.map = mapView
        let camera = GMSCameraPosition.camera(withTarget: (currentLocation?.coordinate)!, zoom: 15)
        mapView.camera = camera

        print("Current location altitude: \(currentLocation?.altitude)")
    }

    func locationManager(_ manager: CLLocationManager, didFailWithError error: Error) {
        print("Error finding location: \(error.localizedDescription)")
    }
}
ConfigGMSAutocompleteResultsViewControllerDelegate used to show place autocomplete predictions in a table view.
//MARK: ConfigGMSAutocompleteResultsViewControllerDelegate method(s)
extension MapViewController: GMSAutocompleteResultsViewControllerDelegate {

    func resultsController(_ resultsController: GMSAutocompleteResultsViewController,
                           didAutocompleteWith place: GMSPlace) {
        searchController?.isActive = false
        // Do something with the selected place.
        print("Place name: \(place.name)")
        print("Place address: \(place.formattedAddress)")
        print("Place attributions: \(place.attributions)")
        if (place.name?.contains("Let\'s Nurture"))!{
            DispatchQueue.main.asyncAfter(deadline:.now() + 2) {
                self.navigateButton(self)
            }
        }
    }

 func resultsController(_ resultsController: GMSAutocompleteResultsViewController,
                           didFailAutocompleteWithError error: Error){
        // TODO: handle the error.
        print("Error: ", error.localizedDescription)
    }

    // Turn the network activity indicator on and off again.
    func didRequestAutocompletePredictions(_ viewController: GMSAutocompleteViewController) {
        UIApplication.shared.isNetworkActivityIndicatorVisible = true
    }

    func didUpdateAutocompletePredictions(_ viewController: GMSAutocompleteViewController) {
        UIApplication.shared.isNetworkActivityIndicatorVisible = false
    }
    func resultsController(_ resultsController: GMSAutocompleteResultsViewController, didSelect prediction: GMSAutocompletePrediction) -> Bool {

        return true
    }
}
GMSMapViewDelegate used to place marker on mapview
//MARK: GMSMapViewDelegate delegate method(s)
extension MapViewController: GMSMapViewDelegate {
    func mapView(_ mapView: GMSMapView, markerInfoWindow marker: GMSMarker) -> UIView? {
        return UIView()
        }
}
Create ViewController.swift file and below code into that file. We are using 2 packages into this file.
1. FocusNode – Focus node is used to add node on live scene
2. SmartHitTest – Used to estimate the position of the anchor, like looking for the best position based on what we know about our detected planes in the scene.
import ARKit
import FocusNode
import SmartHitTest

extension ARSCNView: ARSmartHitTest {}

class ViewController: UIViewController {

    var sceneView = ARSCNView(frame: .zero)

    let focusSquare = FocusSquare()

    var hitPoints = [SCNVector3]() {
        didSet {
            self.pathNode.path = self.hitPoints
        }
    }

    var pathNode = SCNPathNode(path: [])

    override func viewDidLoad() {
        super.viewDidLoad()

        //Add button in navigation bar right side
        let btn = UIBarButtonItem(title: "Add/Clear", style: .plain, target: self, action: #selector(newRouteDraw))
        self.navigationItem.rightBarButtonItem = btn

        self.sceneView.frame = self.view.bounds
        self.sceneView.autoresizingMask = [.flexibleWidth, .flexibleHeight]

        self.view.addSubview(sceneView)

        // Set the view's delegate
        self.sceneView.delegate = self

        self.focusSquare.viewDelegate = self.sceneView
        self.sceneView.scene.rootNode.addChildNode(self.focusSquare)

        // the next chunk of lines are just things I've added to make the path look nicer
        let pathMat = SCNMaterial()
        self.pathNode.materials = [pathMat]
        self.pathNode.position.y += 0.05
        //        if Int.random(in: 0...1) == 0 {
        //            pathMat.diffuse.contents = UIImage(named: "path_seamless")
        //            self.pathNode.textureRepeats = true
        //        } else {
        pathMat.diffuse.contents = UIImage(named: "path_with_fade")
        //        }
        self.pathNode.width = 0.5

        self.sceneView.scene.rootNode.addChildNode(self.pathNode)

        if let data = loadData(){
            hitPoints = data
        } else {
            self.setupGestures()
        }
    }

    override func viewWillAppear(_ animated: Bool) {
        super.viewWillAppear(animated)

        let configuration = ARWorldTrackingConfiguration()
        configuration.planeDetection = [.horizontal, .vertical]

        sceneView.session.run(configuration)
    }

    override func viewWillDisappear(_ animated: Bool) {
        super.viewWillDisappear(animated)
        sceneView.session.pause()
    }
We will draw new route and save that into user defaults for future use and will remove points
//MARK: New route draw and save into user defaults.
@objc func newRouteDraw(){
    let defaults: UserDefaults = UserDefaults.standard
    defaults.removeObject(forKey: "kLetsNurtureRoute")
    defaults.synchronize()
    hitPoints.removeAll()
    self.setupGestures()
}
Will fetch existing routes from user defaults
//MARK: get data from user defaults
func loadData() -> [SCNVector3]?{
    let defaults: UserDefaults = UserDefaults.standard
    let data = defaults.object(forKey: "kLetsNurtureRoute") as? Data
    if data != nil {
        do {
            if let userinfo = try? NSKeyedUnarchiver.unarchiveTopLevelObjectWithData(data! as Data) as? [SCNVector3]{
                return userinfo
            }
            else {
                return nil
            }
        }
    }
    return nil
}
Render scene and update time everytime
//MARK: Update AR view at specific time interval
extension ViewController: ARSCNViewDelegate {
    func renderer(_ renderer: SCNSceneRenderer, updateAtTime time: TimeInterval) {
        DispatchQueue.main.async {
            self.focusSquare.updateFocusNode()
        }
    }
}
Add tap gesture on camera view and on tap add point to that position.
//MARK: Setup tap gesture on camera view
extension ViewController: UIGestureRecognizerDelegate {
    func setupGestures() {
        let tapGesture = UITapGestureRecognizer(target: self, action: #selector(handleTap(_:)))
        tapGesture.delegate = self
        self.view.addGestureRecognizer(tapGesture)
    }

//Handle tap gesture functionality
    @IBAction func handleTap(_ gestureRecognizer: UITapGestureRecognizer) {
        guard gestureRecognizer.state == .ended else {
            return
        }
        if self.focusSquare.state != .initializing {
            self.hitPoints.append(self.focusSquare.position)

            let defaults: UserDefaults = UserDefaults.standard
            do{
                let data: Data = try NSKeyedArchiver.archivedData(withRootObject: self.hitPoints, requiringSecureCoding: false)
                defaults.set(data, forKey: "kLetsNurtureRoute")
            }
            catch{

            }
            defaults.synchronize()
        }
    }
}
Add/Update node when scene is rendering and set plane anchor according to it.
//MARK: Add/update node at the time of rendering
extension ViewController {
	func renderer(_ renderer: SCNSceneRenderer, didAdd node: SCNNode, for anchor: ARAnchor) {
		if let planeAnchor = anchor as? ARPlaneAnchor, planeAnchor.alignment == .vertical, let geom = ARSCNPlaneGeometry(device: MTLCreateSystemDefaultDevice()!) {
			geom.update(from: planeAnchor.geometry)
			geom.firstMaterial?.colorBufferWriteMask = .alpha
			node.geometry = geom
		}
	}

	func renderer(_ renderer: SCNSceneRenderer, didUpdate node: SCNNode, for anchor: ARAnchor) {
		if let planeAnchor = anchor as? ARPlaneAnchor, planeAnchor.alignment == .vertical, let geom = node.geometry as? ARSCNPlaneGeometry {
			geom.update(from: planeAnchor.geometry)
		}
	}
}


Before we start with app purchase, Let’s get a basic idea of what type of digital content we are selling to users. Google’s Billing system gives us mainly two types …

Web Frameworks are basically software packages that ease the complexity of web development. They come with many inbuilt features that are common in web development, thus minimizing the development time, …

There has been an explosion in the use of chatbots across both business websites and messaging applications, mainly because businesses want to cater to their customers and customers have a …
Continue reading “8 Chatbot Development Frameworks: Building a Better Bot for Your Business”

According to Econsultancy, following the personalization of metasearch engine, 93 percent of organizations experienced an increase in transformation rates. Personalization depicts the system and strategies of conveying the content and …
Continue reading “Personalization of advertising and marketing: Tools at a marketer’s disposal”

According to google reports, current e-commerce statistics state that 40 percent of worldwide internet users have bought products or goods online via desktop, mobile, tablet or other online devices. This …